I have just posted a similar blog post about editing a digital image and making it look like it was taken on film a long time ago. This is the version of that tutorial for Gimp. Whilst Photoshop is an absolutely fantastic piece of software, Gimp gives you great opportunities to get to grips with image editing and completely for FREE so if you don't yet own Photoshop, have a look at Gimp as you can still learn a lot from it.
So onwards and upwards, here is a step by step tutorial on how to make a crisp digital still look authentically old. Here's the before and after:
1 - Follow this link: http://gimp-registry.fargonauten.de/node/17267 and download Vignette.SCM. Open the file in your downloads folder and copy it.
2 - Go into your computer and program files. Find Gimp and the Scripts file. Paste the file in here.
(Mine was under Gimp>Share>Gimp>2.0>Scripts)
3 - Open Gimp.
4 - Open your original image and "Save As" a new file so you preserve your original image.
5 - Go to Image>Mode>Grayscale
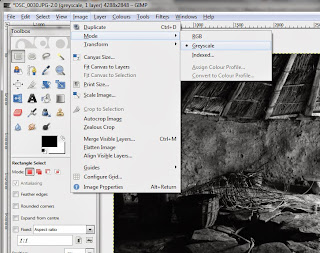
This will remove all of the colour information from your image.
6 - Filters>Noise>RGB Noise
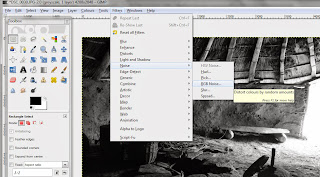
RGB noise (in my experience) has a more even spread than the other options so that the noise effect will apply to the whole image evenly.
Within the RGB noise dialogue you have a couple of options. Check the preview box to see how the effect will work with your image. Unfortunately it zooms into the picture quite a lot but if you focus on areas with shadow then you can see the effect on dark areas which is where you will notice it the most.
Checking "Correlated Noise" keeps the speckles quite uniform and clustered in their groups depending on their darkness whereas keeping it unchecked allows a messier grain to be applied to the image which is the style I use for this type of image.
You can then use the grey slider to choose how intense you want to make your grain.
7 - Image>Mode>RGB
(You will need to revert back to RGB mode in order to use the vignette otherwise you will just get a bunch of error messages.)
8 - Select the whole image using the Ellipse select tool.
9 - Filters>Light and Shadow>Vignette
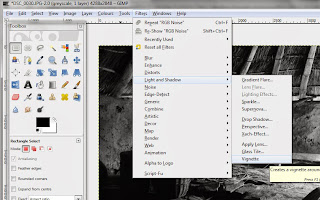
In the vignette dialogue box you have several options:
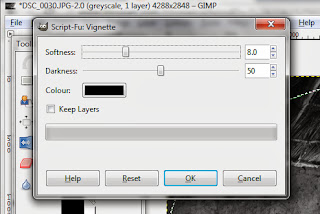
Softness decides on how far the vignette edges will spread. The more you increase the softness the less obvious the vignette will be and the dark edges will spread further towards the centre of the image. The lower you pull the slider for softness, the further towards the edges of the image the vignette will stay. For this style of photo I am keeping the softness quite low in order to make the vignette quite obvious.
You can then select how dark you want the edges to go, I went to about 75 for my image as I wanted to vignette to be noticeable but not too blocky.
You could change the colour if you wanted to experiment but I kept mine black to keep it authentic.
I always check the "Keep Layers" option as it applies to vignette effect onto a different layer instead of putting it directly onto the image. This way, if I decide to remove the vignette at a later date, it is as simple as deleting the vignette layer, rather than trying to go back through all of my editing.
Once you are happy with your image, accept to flatten the image when you save it as a jpeg and all of the layers will collapse down into one final picture.
Friday, 27 September 2013
Putting your pictures into the past! (Photoshop CS5)
This tutorial is all about using post production techniques to make a digital image look like it has been taken on film, and a long time ago too! I have also done this tutorial for GIMP Image Manipulation software which I will write a follow-up blog for also.
I'm going to make this a step by step tutorial to break it down but here is the beginning and end result:
Obviously results will vary on how you set up your techniques so enjoy playing with your images and please do share what you achieve with this technique! So, on with the tutorial...
1 - Open you image in Photoshop and "Save As.." a new file so that you preserve your original.
2 - Go to Image > Mode > Grayscale
This will remove all colour information and make the image black and white.
3 - Filter > Noise > Add Noise
This will add grain to your image. How much grain you choose is up to you. Gaussian Noise mixes up the light and dark shades so that the grain appears more scattered. Uniform Noise tends to be more collected so that the darks and lights are more grouped.
I go for Gaussian for this style of image so that the grain is more obvious but it's up to you which you use. I set the amount to around 14% for obvious graininess but the amount you need will vary on the shades within your image so have a play around as you can preview the effect on your image before you commit!
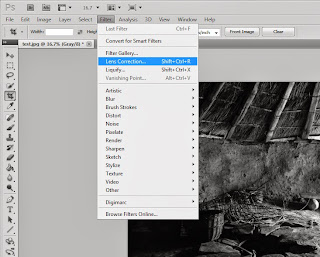
4 - Filter > Lens Correction
5 - Choose "Custom" tab on the right hand side and edit Vignette Settings.
Amount = +values go light at the corners
-values go dark at the corners
Midpoint = Low values create a small spread of light from the centre of the image
Higher values create a larger spread of light so the corners are clearly darker than the rest of the image.
And that's it! Convert an original sharp digital image, to an old-fashioned style image as if it is taken on film not digitally.
I'm going to make this a step by step tutorial to break it down but here is the beginning and end result:
1 - Open you image in Photoshop and "Save As.." a new file so that you preserve your original.
2 - Go to Image > Mode > Grayscale
This will remove all colour information and make the image black and white.
3 - Filter > Noise > Add Noise
This will add grain to your image. How much grain you choose is up to you. Gaussian Noise mixes up the light and dark shades so that the grain appears more scattered. Uniform Noise tends to be more collected so that the darks and lights are more grouped.
I go for Gaussian for this style of image so that the grain is more obvious but it's up to you which you use. I set the amount to around 14% for obvious graininess but the amount you need will vary on the shades within your image so have a play around as you can preview the effect on your image before you commit!
4 - Filter > Lens Correction
5 - Choose "Custom" tab on the right hand side and edit Vignette Settings.
Amount = +values go light at the corners
-values go dark at the corners
Midpoint = Low values create a small spread of light from the centre of the image
Higher values create a larger spread of light so the corners are clearly darker than the rest of the image.
And that's it! Convert an original sharp digital image, to an old-fashioned style image as if it is taken on film not digitally.
Tuesday, 15 January 2013
Figuring out the CHDK shutter speeds
This table is to try and help figure out the calculations for the different Value Factor fractions against different shutter speeds to help you figure out the maths.
Shutter Speed Value Factor Final Shutter Speed
1/10 5 0.5 sec (1/2 a second)
1/100 5 0.05 sec (1/20 second)
1/1000 5 0.005 sec (1/200 second)
1/10000 5 0.0005 sec (1/2000 sec)
1/100K (1/100,000) 5 0.00005 sec (1/20000 sec)
1/10 5 0.5 sec (1/2 a second)
1/10 50 5 seconds
1/10 500 50 seconds
Shutter Speed Value Factor Final Shutter Speed
1/10 5 0.5 sec (1/2 a second)
1/100 5 0.05 sec (1/20 second)
1/1000 5 0.005 sec (1/200 second)
1/10000 5 0.0005 sec (1/2000 sec)
1/100K (1/100,000) 5 0.00005 sec (1/20000 sec)
1/10 5 0.5 sec (1/2 a second)
1/10 50 5 seconds
1/10 500 50 seconds
CHDK Shutter speed... a reminder that I hate maths!
So I have frazzled my brain a lot and with thanks to 89rafa from YouTube for explaining the basics of the maths to me on my original video, I now believe I have an understanding of the way in which you can calculate the shutter speed in CHDK when you are multiplying the shutter speed by fractions. For a loser in maths like me this is a real headache but I hope I can simplify it the best I can to make it clear for others too.
So the easy part of overriding shutter speed with CHDK is taking the value factor (number you multiply the shutter speed by) as a single number and working out how many seconds you want your shutter speed. This would be something like:
Shutter speed: 60
Value Factor: 1
1 x 60 = 60 leaving a 60 second shutter speed.
Not too tough right?
This is the way the shutter speed is calculated in "EV step (Exposure Value step) shutter speed enum type" in CHDK. However when we use the "Factor shutter speed enum type" it gets harder to calculate.
We change the bottom number to a fraction and it gets more complicated.
Here is a simple version...
Shutter speed: 5 (seconds)
Value Factor: 1/10 (One tenth of a second)
Here we are multiplying 5 seconds by one tenth of a second. The easy way to do this is to divide 5 by ten which leaves us with 0.5 of a second, or.. half a second.
As another example...
Shutter speed: 50
Value Factor: 1/10
We are still dividing the top number by the fraction so if we divide 50 by 10, we get 5. So the shutter speed is 5 seconds.
And so on and so forth. So in those examples we were changing the shutter speed and always dividing the number by ten.
However, we can also change the fraction and this is where things switch around and the shutter speed can be lower than the number dividing it.
As an example...
Shutter speed: 5 (seconds_)
Value Factor: 1/100 (One hundredth of a second)
Here we are dividing 5 seconds by one, one hundredth. The way to figure this one out is to calculate how many 5's there are in one hundred, in this case the answer is 20. This number then goes into a fraction as we are dividing 5 by 100 and the answer is 1/20th of a second.
It's a lot to take in but once you get used to it you can figure the maths out. Here are some ways to remember how to calculate it...
If the shutter speed number is smaller than the bottom fraction number e.g SS 5 VF 1/10 then you are calculating a faster shutter.
If the shutter speed number is larger than the bottom fraction number e.g SS 50 VF 1/10 then you are calculating a slower shutter.
If you are keeping your value factor at a certain fraction, then all you have to do is move the decimal point. For example here I am always using the fraction of 1/10 so I am always dividing by ten:
1/10 x 5 = 0.5 of a second
1/10 x 50 = 5.0 seconds
1/10 x 500 = 50.0 seconds
So if I were using a Value factor of 1/100 I would move the decimal point two points over instead of one.
Tuesday, 8 January 2013
Using Photoshop to blur out image details/logos
Sometimes we take a really great picture, and then we realise we have someone's car registration or personal information or perhaps a child walking through the image that we don't really want to expose to everyone just incase it could upset the child's parents or upset the car owner etc.....it's nice to respect other peoples information.
So with a little help from the Filter Gallery in Photoshop we can still keep that picture we took and share it with whoever we like by covering up those individuals details.
I took this shot of a car going through a puddle on Christmas day and decided to share it having covered up the registration number first. This gave me the idea that it would be worth doing a quick tutorial on some techniques for covering up parts of pictures.
By selecting the area of your image you would like to blur out you can cntrl/apple + C to copy that part of the image and cntrl/apple+ V to past the copied part of the image into a new layer. When we use the filter gallery it will affect the whole layer that we are on so we only want those small parts to be affected, hence why we copy and paste to a new layer.
On the top bar select filter and then filter gallery and there is a whole menu of different effects to choose from so it's worthwhile taking your time to look through them.
Check out the new tutorial to see some suggestions:
Subscribe to:
Posts (Atom)