I'm going to make this a step by step tutorial to break it down but here is the beginning and end result:
1 - Open you image in Photoshop and "Save As.." a new file so that you preserve your original.
2 - Go to Image > Mode > Grayscale
This will remove all colour information and make the image black and white.
3 - Filter > Noise > Add Noise
This will add grain to your image. How much grain you choose is up to you. Gaussian Noise mixes up the light and dark shades so that the grain appears more scattered. Uniform Noise tends to be more collected so that the darks and lights are more grouped.
I go for Gaussian for this style of image so that the grain is more obvious but it's up to you which you use. I set the amount to around 14% for obvious graininess but the amount you need will vary on the shades within your image so have a play around as you can preview the effect on your image before you commit!
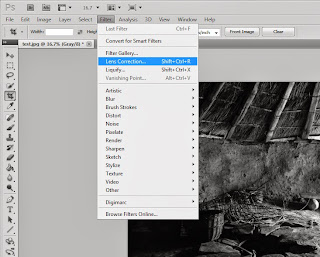
4 - Filter > Lens Correction

5 - Choose "Custom" tab on the right hand side and edit Vignette Settings.
Amount = +values go light at the corners
-values go dark at the corners
Midpoint = Low values create a small spread of light from the centre of the image
Higher values create a larger spread of light so the corners are clearly darker than the rest of the image.
And that's it! Convert an original sharp digital image, to an old-fashioned style image as if it is taken on film not digitally.


Nice tutorial..Really i appreciate the effort you made to share the knowledge.
ReplyDeleteImage Editing Service in dmt